
 |
Freda is a free program for reading electronic books (ebooks) on Android and Windows PC, Tablet and Mobile. |
Features:
Basic book-reader capabilities are available free of charge, but certain features are restricted untill you pay for the 'premium features' add-on.

|
|
| On Windows, if you don't want to use the Microsoft Store, you can alternatively sideload Freda by downloading and installing an MSIX file. | |
When you run Freda for the first time, a series of 'first run' popups will be displayed, offering you options for how to configure the application (for instance, switching on various accessibility features). If you don't want to go through all the questions, you can just click the 'abandon' button and you'll get a standard default setup (you can go back and do the 'first run' later if you want).
When Freda first opens, you will see a table containing six classic books. To open one of them, click the book image. The screen will go blank and the book will start to download. After a few moments, the book will open, and the first page (generally a title page, showing an image) will appear. You can move to the next page by tapping (or mouse-clicking) at the right hand side of the page.
You will see a page number indicator, "-/-" at the bottom of the page (the -/- symbols mean that Freda has not finished scanning though the book, and so it doesn't yet know how many pages there are). A 'progess ring' indicator will appear at the top of the screen as long as the scanning process continues (maybe for several minutes), but you can begin reading right away.
For more information, read on ...
First, a word on screen layouts. Freda adjusts the size and positioning of items on the screen, according to how large its screen is. On small screens (i.e. on mobile devices or small tablets) Freda will nornally display its content on a tabbed page, so it only presents one section (bookshelf, sources list, current book details, settings ...) at a time, with tabs along the bottom of the screen for switching from one section to another. On larger screens (desktop and laptop PCs), the bookshelf and sources list will be shown on a panorama (one wide page). You can change this setup using an application setting. But note that, if screenshot in this guide doesn't look quite the same your device, it may be because the application pages are organised differently; the screenshots in this manual were taken with a large screen on a PC.
Freda's functions are organised across various application pages:
| bookshelf: the list of books that Freda knows about. It's initially populated with six classic books from the Gutenberg catalog, but when you download more books, they'll appear here. To open a book from this list, tap/click on it; a right-click/long-tap allows you other options (such as editing book details or managing tags). You can sort and filter the books in this list. | |
| sources: the list of places that Freda can download books from; it includes on-line catalogs like Gutenberg, but also personal Cloud storage such as OneDrive (Google Drive, DropBox and Synology stores are available too). | |
| book details: information about the currently selected book, plus control buttons for editing book information, managing tags, and changing cover images | |
| settings: controls that let you adjust application appearance and behaviour, and the way that books are displayed. The settings are grouped under different headings (text, layout, behaviour ...). There is also a section for defining and using 'presets', which is to say named groups of settings you can apply all together with one click (for example 'night', which applies a colour scheme suitable for night-time reading). | |
| sync+archive: controls for creating and loading Freda archives (so you can make a backup of the app, or transfer its contents to another device; if you've paid to enable premium features, you'll also see controls for automatic synchronisation of Freda's contents between all the devices you are using. | |
| book reader: the contents of the book that you're currently reading. You have many options to customise how this page works, but when Freda is first installed: a click/tap at the edge of the page will move forward or backward through the book (depending which edge you tap), and a click/tap on the three dots at bottom right will open menu ribbons for navigating through the book, starting text-to-speech, and other functions. a right-click/long-tap will pop up selection handles for selecting text (and tapping on the selected text will then allow you to add bookmarks, copy text, etc.) |

The menu also includes support tools, privacy policy, legal notices and so forth.
On these application pages, functions are presented in a horizontal menu bar at the top of the page (except for the book reader page, which contains repositionable menu bar ribbons at top and bottom of the page). The application does have an 'accessible' mode, in which horizontal menu bars are not shown; instead, all functions are reached using menus that cascade down from the top of the page, navigable using tap/arrow/enter keys.

Initially, the bookshelf page shows a table of recently-opened books (when you first run Freda, it is pre-populated with a list of classics from Gutenberg). To open a book, tap on the book tile. Freda will then switch to the Book Reader screen. If the book was not already in the machine's memory, Freda will download it. This means that the first time you open a book, you must have network connectivity, but after that the book will be held in the machine's memory, so you will not need network access to continue reading it. Freda will keep up to a thousand books downloaded; after that it will delete the least recently opened books, so you will have to download them again.
Note that, depending on your screen size, you may need to scroll up to see some entries in the bookshelf (if using a mouse, hover it over the right hand edge of the bookshelf area to make the scroll bar visible).
If you prefer to see your bookshelf as a list of books, tap the 'layout' button in the command bar.
To filter the contents of your bookshelf, tap the 'filter' button in the command bar, and enter search text for title and/or author, metadata, series and so forth. There are also drop-down controls that you can use to apply a filter that shows only books that have, or do not have, a certain tag (for instance 'show all the books that are not tagged as Historical' ).
To sort the list of books, tap the 'sort' button in the command bar and select the way that you want the books to be sorted.
Note that when the bookshelf is in 'list' mode, you get a richer set of options for sorting books (by tag, by series, and so forth). In those views, you will see 'section header' elements (e.g. grouping all books having the science fiction tag, or all authors beginning 'A'), because in the list view the app can include section headers for each group of books in the bookshelf. To see the list of available groups, tap on one of the 'section header' elements.

Right-clicking with a mouse or holding (with mouse, pen or finger) on a book will display a menu with various options:

The sources page shows the list of places that Freda can download books from; it includes on-line catalogs like Gutenberg and Internet Archive, but also personal Cloud storage such as OneDrive (Google Drive, DropBox and Synology stores are available too). You can add and delete sources from this list, or - if there's a source that you might want in the future but don't always want to see in the list, you can 'hide' it, so that normally it won't be visible. Note that, depending on your screen size, you may need to scroll up to see some sources (if using a mouse, hover it over the right hand edge of the sources list to make the scroll bar visible).
To open one of the book sources, tap on it. A page will be shown, where you can navigate around the source and select a book to download. For most catalog types, this new page is presented in Freda, but there are exceptions: a web-site source will just open a browser window, and a folder source will open a picker window that you can use to choose the book file you want. Note, that if you want to load multiple books in one go from folder and its subfolders, you should do this by running the initial setup option the support menu.
The list of sources has command bar buttons allowing you to add a new source, or to filter book sources (normally, you don't see sources that have been flagged as 'hidden'; to make these sources visible, tap the 'filter' button).

This page allows you to find and download books from OneDrive and other cloud storage sites, plus popular on-line book catalogs, such as Gutenberg (and your own Calibre catalog, if you have set this up).
The app command bar contains buttons for editing the source details, for logging into the source, and for managing the selection of multiple items in the source (you can also start a multiple selection by right-clicking/holding on an item in the catalog).
The screen shows the contents of the book source a a vertical list, containing a combination of 'catalog' items (which look like folders) and 'book' items (which look like thumbnail images, showing book covers or a book icon). Tapping a 'catalog link' item takes you to another place in the catalog (for example, 'Recent' may take you to a list of recently-added books). Tapping a 'book link' item will download or open a book from the catalog. Note that, depending on your screen size, you may need to scroll up to see some entries (if using a mouse, hover it over the right hand edge of the list to make the scroll bar visible).
Above the contents window, you will see buttons, for moving around within the catalog:
| Up: goes up to the parent folder (if this source is organised in a folder structure). | |
| Back: goes back to the last catalog page you were looking at. | |
| Stop: stops the current source navigation. | |
| Home: moves to the starting page in the catalog. For OPDS catalogs this is a specific 'home' location defined for the catalog; for cloud sources like OneDrive it will be the 'root' folder. | |
| Refesh: refreshes the current folder contents by sending the query to the source again. | |
| Previous: moves to the previous catalog page in a list (if this catalog's pages are organised as lists). | |
| Next: moves to the next catalog page in a list (if this catalog's pages are organised as lists). | |
| Search: searches the current catalog. | |
| Sort: orders the contents of the current page by name or by date. |
Depending where you are in the catalog, some of these buttons may be absent (for instance, the 'next' and 'previous' buttons will only appear if you are looking at a multi-page list in an OPDS catalog, such as 'all authors beginning 'A'').
The 'search' button will be available only for OPDS catalogs with a 'search url' has been set up for this catalog. You can set up this and other details by using the 'edit' button in the command bar.
The 'sort' button is available only for catalogs, such as OneDrive and other cloud services, that are organised as files and folders.
The 'book' page shows you information about the currently selected book. Tap the 'open' button to start reading this book, or use the other buttons in the command bar to delete the book, or to edit the book information, or to replace the cover image.
There is also a 'tags' button; tap on this to create, add, and remove tags for your books. You can use these tags to group book (by genre, subject, whatever). Freda understands the tagging scheme used by Calibre; when you download books from this source, tags are automatically imported. In addition, some EPUB files also include embedded tags, which Freda will apply when you first open the book. When you tap the 'tags' button, a popup window will be shown, which includes the following elements:

The 'sync and archive' page contains tools for saving and restoring the contents of Freda, and for synchonising Freda's state across multiple devices. The page can display two different sections:
sync: This section is for setting up automatic synchronisation between Freda on two or more devices. It works by regularly copying to OneDrive a journal of what Freda is doing on the device, and by replaying, on this device, journal files received from all other devices. To make synchronisation active, adjust the toggle button to 'yes', and ensure that OneDrive is signed in (if it isn't, a message to that effect will be displayed at the bottom of the page). While synchronisation is taking place, status and error messages will be displayed on this page.
To save power and network bandwidth, Freda won't automatically synchronise changes from more than one week ago, so for best results when installing Freda on a new device, begin by making an archive on an existing device, and uploading that archive onto the new device, so that the new device starts off in a synchronised condition.
Note that sync is a premium feature, so it may not be available on your setup if you have not paid for the Freda premium package.
archive: Using this section, you can export an archive of this device, or import an archive that you have previously created (either from this device, or another device). Check box controls are provided to allow you to make the operation selective (for example, if you're loading an archive but you don't want to make any changes to the app settings, then you should leave the 'settings' checkbox unchecked).
You can specify the location of the archive files that will be imported/exported, using the 'archive location' control. This will be either 'OneDrive' (in which case the archive will be on your OneDrive in a subfolder called 'freda/save') or 'pick a folder' (in which case, when the archive operation starts, you will be prompted to select a folder).
To start the archive operation, tap the 'import' or 'export' button at the bottom of the page. While the operation is taking place, status and error messages will be displayed on this page. If you want to stop the operation before it is complete, tap the 'cancel' button that will be showing on the page as long as the operation is in progress.

The Settings page allows you to customise various program settings, controlling appearance and behaviour of the program. The page offers sections for different kinds of setting; the section labels are on the left, and, for each section the available settings are on the right. Note that, depending on your screen size, you may need to scroll up to see some entries (if using a mouse, hover it over the right hand edge of the settings list to make the scroll bar visible).
To modify a setting on this screen, tap on the setting text; this will display a popup window showing some explanatory text and a control that you can use to modify the setting. Modified settings are shown with a '*' next to them. Once you've changed the setting value, tap the 'apply' button if you want to keep the change, or the 'undo' button to close the popup without making any changes.
There is a common pattern whereby many settings have values labelled 'book style/something'. These settings are used for cases where a value might be provided by the book file itself, and you might or might not want to override that value. For instance, an EPUB book file may specify what font is to be used for the whole book, or it may specify different fonts for different sections of text - or it may not specify any font at all. If Freda's 'font' setting was 'book style/Arial' that would mean that, for EPUB files that specified no font, Arial would be used, but if the EPUB file did specify a font, then that specified font would be used. Alternatively, if instead you'd made the 'font' setting just say 'Arial' that would mean that, no matter what font was specified in the EPUB file, Freda would always use Arial.
Some settings (ones with simple values) also provide an in-line control - for instance a 'yes/no' toggle switch - which you can use to adjust the value immediately, without opening a popup window.
At this stage, your newly chosen setting values still have not actually been applied to the program. To make the program use the new settings you entered, tap the 'save' button in the application bar (or if you don't want to use them, tap the 'undo' button instead).
The sections contain groups of settings as follows:
text: Settings that control the size, style and colour of the text on the book page.
layout: Settings that control how text is laid out on the book page, including the spacing of words and lines, the alignment and indentation of paragraphs, and hyphenation (i.e. the way that long words will break, if they don't fit into the line).
reading page: The appearance of the reading page, which is to say the padding around the edge of the text, the number of columns of text, the orientation (landscape or portrait) of the page, the appearance of page numbers, etc.
behaviour: Settings that describe how the app will work (but which do not change the appearance of book text). You will find settings for password lock, the operation of search and auto-read functions, device sync, and the appearance of the app user interface (both its colour scheme, and also the way that you access various application pages via tabs, panorama sections or the application 'hamburger' menu).
book processing: Miscellaneous advanced settings for customising the way that books are loaded, including special processing steps for TXT and PDF files, and the selection of the text encoding. There is also a setting, 'CSS rendering', that allows you to specify what Freda does with the CSS styles in EPUB books: normally Freda will do its best to apply all of these styles faithfully, but if you're experiencing layout problems (such as over-large margins, overlapping text, or text being squeezed into columns that are too narrow), you can opt to use simplified layout, or to entirely ignore the CSS style sheets.
screen controls: Settings for controlling the effect of tap/click and drag gestures on the book reading page, generally, and also at specific points on the screen. Note that you can't customise the effect of the long-tap/hold/right-click gesture, which will always have the effect: if on a word, select the word; if on empty space then pop up the control menus. This is because we need to reserve one gesture that will always let you get to the settings screen, no matter what other customisations you might have applied
keyboard: (only applicable for devices that have keyboards) Customisations for what happens when you press various keys when on the book reader screen. You can set separate custom effects for each key alone, and when Shift is pressed, and when Ctrl is pressed.
presets: Management of application presets. A preset is a named grouping of settings that you might want to apply together. For example the 'night' preset consists of colours for ink (that is the text foreground), paper (the text background) and link text that you might choose to apply together when you're reading a book in a dark environment. When that preset is applied, it will update the settings for ink, paper and link ink, but will leave all other settings unchanged. To modify a preset, tap on it and select 'edit'; a popup list will be shown consisting of all the settings names, with checkmarks next to each setting that is currently included in the preset. To save the preset click 'save', which will write into the preset the current values of the selected settings.
Other options available when you tap on a preset allow you to delete it, to apply it, or to move it up or down the list of presets. For presets that you use often, it can be useful to move them near to the top of the list because it will mean they're always visible on the 'presets ribbon' on the book reader page, without having to scroll the ribbon horizontally.
To add a new preset, enter a name for it in the text entry box at the top of the page, and tap the adjoining + button. There is also a special preset available, at the botton of the list, which allows you to specify preset settings that will be applied whenever you (re-)open the book that you're currently reading.

The Reader screen shows the text of the book you are reading. While a book is opening, it will show a spinning 'progress ring' at the top of the screen; as soon as Freda has some text to show you, the text will come up on screen. Meanwhile, Freda will continue to prepare other sections of the book. EPUB books are broken into chapters, and Freda takes advantage of this when loading books, by quickly loading whichever chapter you need to see, and putting it on-screen just as soon as it is ready. The program will carry on with loading all the other chapters as a 'background' task, but you can begin reading while it does this. Until book loading is complete, you may find that screen movements are jerky and not very responsive, however.
To page forward or back, tap at the edge of the screen. Using the Settings screen, you can customise gestures for changing pages (for example, making a swipe gesture select text, rather than changing page).
A menu of actions is available, and further actions and controls are available in control ribbons that appear top and bottom of the screen. You can always select text by long-tapping/right-clicking on a word, and, once the selection handles pop up, dragging them to surround the text that you want to select. When you tap on selected text, a menu will pop up to ask you what you want to do with it (unless you customised a certain action to always happen to selected text- see below). You can use this menu to apply a highlight colour, bookmark or note, or to search for text (in a dictionary, on the internet, in Bing Translate, or in the book that is open), or to start reading aloud, or to copy the selected text to the clipboard, or to open all the control ribbons to perform further actions.
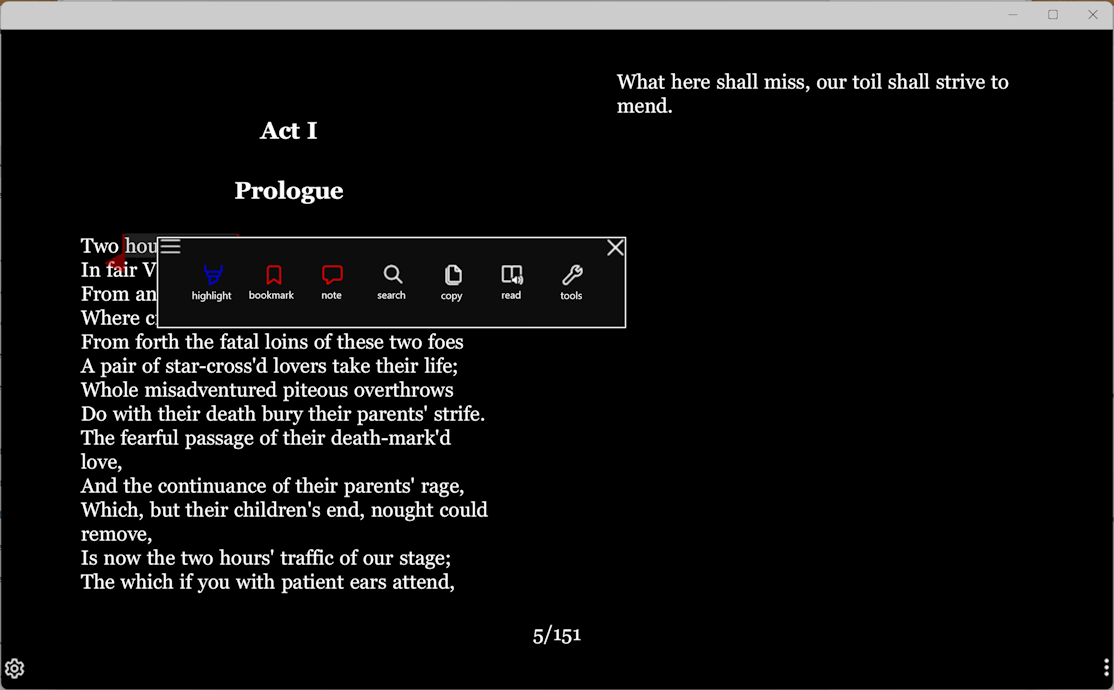
By tapping the 'tools' item on the popup menu, or long-tapping/right-clicking on a blank section of the page, or tapping the '...' element at the botton right of the page, you will open all of the popup control ribbons, which will result in a screen display like this:

By default, the four ribbons are stacked, two at the top of the screen, and two at the bottom. Along the top of each ribbon are controls to minimise, open and close the ribbon, and - at the left of the ribbon - a drag-handle which you can use to move it around the screen. Tapping on that handle will open a menu that offers you options to reposition the ribbon, and to open or close all the ribbons. Ribbons can be positioned:
docked (at top or bottom): The ribbon sits above or below the book text, and will remain there, after a ribbon command is finished or the 'close ribbons' action is performed. You'd dock a control ribbon because you want to be able to see and use it all the time while reading, without having to tap the '...' button to make the ribbon appear.
stacked (at top or bottom): The ribbon sits at the top or bottom of the page, and covers up some of the book text. It will go away when you 'close ribbons' (by choosing a menu action, by tapping the book text, or by selecting 'close all' from the dropdown men on a ribbon handle).
floating: The ribbon sits somewhere the page, and covers up some of the book text. It will go away when you 'close ribbons' (by choosing a menu action, by tapping the book text, or by selecting 'close all' from the dropdown men on a ribbon handle). You can make a ribbon 'float' by dragging on its handle, to reposition it anywhere you want on the page.
Controls Ribbon: Buttons to go back (to the app main page), to go to previous or next chapter, to manage settings, and to manage the control gestures for the reading page. There is also a 'help' button, and a special control for setting custom actions. This control defines what will happen when you select text. By default, this is 'choose', which is to say that when you've selected some text, you get to choose what to do with the selected text (tap on the selected text, and you'll get a menu offering all the possible choices). But you can set this control to define a specific action that will always happen when you select text - be it highlighting it, adding a bookmark or note, searching for it (on the internet, in a dictionary, in the book text, etc.), copying it to the clipboard, or beginning to auto-read/read aloud).
Info Ribbon: Buttons to display the 'book information' popup (for viewing or changing book details and tags), and for going to different chapters, pages or sections of the book. It also displays the author and title of the book and the name of the current chapter, if available.
Presets Ribbon: Rectangular buttons for each of the available setting presets that you can apply. This list can be scrolled horizontally to see all the presets (with a mouse, hover over the bottom of the ribbon to see the scroll bar; with a touch screen, swipe left on the preset list). There is also a button to manage the presets (reorder them, add and delete presets, or edit the contents of a preset).
Navigation Ribbon: Buttons for accessing the list of bookmarks in the current book and the table(s) of contents for the book. There is also a control for navigating around the book. This consists of a horizontal strip, with breaks in it. The strip represents the length of the book (so tap half way along it to move to the middle of the book). There are breaks in the strip to show the chapter breaks in the book. Also shown are markers for the positions of any bookmarks, and a downward arrow showing the current position in the book; you can drag this arrow to 'flick through' the pages of the book, without the ribbon being closed, or you can tap on it to show a popup window that allows you to specify an exact page number to go to. If you've already navigated within the book, the strip will also include a back-arrow, showing where you navigated from; tap on this arrow to go back to that position in the book.
The main application menu's 'Feedback' item allows you to submit feedback about Freda - either by sending an email with your comments or by submitting a review to the appropriate app store. If you want to suggest or request new features for the app, the best approach will be to send an email - it's not always easy for me to respond to app store reviews, if I need to ask for clarification.
If, rather than having a suggestion to make, you're experiencing a bug or problem with the app, it will be best to send an email requesting support - this will get a quicker and more comprehensive response than you'll get by sending a feedback email or app store review.
The 'Support' item on the main application menu allows you to perform miscellaneous actions, including sending an email to ask for help.
release notes: Shows the release notes for the current version of the app. Normally these will describe what has been changed, in the latest app update.
email for support: Sets up an email to request help with Freda.
save log file: Saves Freda's log file to a location selected by you. This file can help with debugging any problem that you want to report with the app.
clear all user data: Puts Freda back into the state that it was when first installed - by deleting all books, and reverting the list of sources and the settings and presets. Normally the easiest way to do this is to uninstall and reinstall the app, but if, for some reason you don't want to do that, this menu option will achieve the same effect.
clear working files: Deletes temporary files that Freda has created. In normal operation, Freda creates a lot of working files (recording the structure of the book files that it has parsed, and the where the words appear on the book pages). These can take up disc space, and if you want to reduce the amount of space used by Freda, you can use this menu option to release disc space by deleting these files. The result will be that, when you reopen any of your books, Freda will initially take longer to display the book content (because it has to create the files again).
initial setup: Runs the 'first run' actions again. When you first run Freda after installing it (and additionally, when Freda is first run after upgrading from version 4 to version 5), it will display a series of screens asking how you want to set up Freda, and whether you want to load an existing library of books into the app (from a backup, from a folder that contains book files, or from an existing Freda version 4 installation if there is one). You can re-run the inital setup any time you like, by using this menu option. Note, incidentally, that if you want to import a load of books from a folder (or a whole structure of folders) then this is the way to do it - one of the options for loading Freda's library is to import book files from a folder.
service message: Shows the current Freda 'service message', if there is one.From time to time, Turnipsoft may need to inform Freda users about some issue with the app, or about an impending update. In these cases, a 'service message' popup will be displayed by the app (the app fetches it by checking a special file on Turnipsoft's website). The popup will generally be displayed only once. But if you want to see it again, this menu option will do so.
Freda is free to use, and does not display advertising (earlier versions of Freda did display advertising; these versions of the app are now unsupported and will eventually become unusable - if you're using such a version, please upgrade). Certain features of Freda are 'premium features', namely:
Normally, you have to pay for the premium package, but exceptions are made for people who've been using the previous ad-supported version of Freda for a while, and for those who previously purchased the Freda 'remove advertising' in-app purchase item.
If you do not have the premium package, you will see a grey text box at the bottom of the main app screen, containing a message inviting you to go to the app store and pay for it. If you click on the button next to that message, a popup window will be displayed, which includes a button you can click to buy the premium package. There's also a 'check' button that you can use, to prompt Freda to check back with the relevant app store, and confirm whether premium features have been purchased (this can be helpful if you've migrated a Freda installation from one Android phone to another - because in this case, Freda can lose track of the information about the earlier purchase).
Note that, separately from the Freda application, there is a paid-for app called 'Freda+', which was historically made available as an option for people who wanted to acquire a paid-for, ad-free version of Freda. This app is now off the market and not available for new downloads. Existing users of Freda+ can continue to use Freda+ for as long as they want, though it will not receive further updates and will eventually become obsolete. If you are using Freda+ you can transfer your licence, so as to allow you to use the new Freda app with premium features enabled. In Freda+, tap on the support menu button, and you will see an option for licence sharing. Tap this button and follow the instructions. After this, when you run thw new Freda app, you will find that premium features are enabled (if not, you should try the licence sharing menu's 'check' button to force the app to go and look for the licence).
We don’t claim that our app, Freda, is good for anything – if you think it is, that’s great, but it’s up to you to decide. If Freda doesn’t work for you, that’s too bad, but it really is not our problem. If you lose millions because Freda messes up, it’s you that loses the millions, not us. If you don’t like this disclaimer, just don’t use Freda. We reserve the right to do the absolute minimum provided by law, up to and including nothing. Our liability for loss or damage of any nature will, in any case, be limited to the amount you paid for the app. If you have any queries regarding any of our terms, please contact us.
But seriously if you do have any difficulty with Freda, do by all means contact us using the option on the support menu, and we may be able to help. The point is that Freda is not backed by some huge business empire with massive resources; we're not in a position to guarantee that Freda will meet any particular standards of performance, reliability, fitness for purpose or anything else. Freda started out as a spare time / evenings and weekends project, and frankly it still is just a hobbyist activity. If lives or livelihoods are at stake you should not be relying on Freda.
Turnipsoft does not access, collect, store or share any information about your use of the Freda app; we do not collect or store any personal and sensitive data, as a matter of course.
But please be aware that the app can be used to connect to on-line services (such as OneDrive, DropBox, Google Drive and online book catalogs). When you connect to these services, the app will transmit some information over the internet; at a minimum this will include your IP address. This information could be used to identify you; to understand the implications of your IP address being used for internet access, please refer to the Wikipedia article on 'internet privacy'. Additionally, if you provide login details (for instance, a user name) for an on-line service, the app will use these details when accessing it. Turnipsoft has no control over the way that your personal information might subsequently be used by the providers of the on-line service; if concerned, you should refer to the provider's privacy policy.
The application also allows you to upload your bookshelf details and settings to OneDrive for purposes of backup and synchronisation between devices. Any information uploaded to OneDrive will be managed by Microsoft in accordance with Microsoft’s applicable policies.
Our applications are distributed via app stores (such as the Microsoft Store, Google Play and Apple App Store). The providers of these stores may gather information about your usage of our apps, and any purchases you may make (although Turnipsoft will not store any of this information, we can’t give you any assurance about what the app store provider will do with it). If concerned, you should refer to the privacy policy of the app store.
Note that Freda does allow you to purchase a licence to use certain features of the app ('premium features') and if you have bought such a licence and you decide to get Freda to share this licence between several machines, we do need to collect, transmit and store some data in this case. For details please refer to Data Handling and Deletion (Licence Management).
If you send an email to us, we may retain that email to help us respond, and for reference in case of similar queries in the future. We will retain the mail indefinitely. If you want us to delete any email(s) you send us, please tell us so, in the body text of your email.
Note, incidentally, that Freda did in the past display advertising. That meant that Freda's privacy policy was a whole bunch more complicated (and some might say 'ethically compromised'). Indeed the decision to switch to a 'freemium/nagware' model for Freda was largely about the difficulties with that - for further discussion on this point, please see the 'Freda and Privacy' post in the Freda forums.
Margin and Layout Problems
Freda tries to interpret the margin and indent directives in a book in a reasonable way, but for some books you may have issues such as:
OneDrive Sign-in not working on Android
If you're having trouble with getting the Freda Android app to log on to OneDrive, it may be fixed by switching your default browser to Chrome. This is the result of some obnoxious security rule that Google has built in to the Android operating system, and so far I didn't find any way to work around it.
Once you've completed the OneDrive sign-in using Chrome, and got Freda connected to OneDrive, you can then revert to using whichever browser you prefer - it just needs to use Chrome for the first sign-in (and the bit where it displays the prompt asking you to give permission for Freda to access your OneDrive).
Funny Characters appearing in the text (TXT books)
A TXT file contains a stream of bytes. Any program that wants to turn those bytes into text has to make some assumption about how the author of those bytes expected them to be converted into text - because the file just contains the bytes, in doesn't include any hints about what the bytes actually mean. In technical terms, the program (e.g. Freda) needs to decide what Encoding the author used, when converting their text into bytes. To learn all about encodings, look the subject up on Wikipedia ('Unicode' is a reasonable place to start).
If you don't want to make a lifetime's study of the subject, all you really need to know is: If your TXT book appears to include streams of weird characters, particularly in places where you expected to see quote-marks, dashes or accented characters, it's happening because Freda guessed what encoding was used by the file's author, and Freda guessed wrong. You can tell Freda what encoding it should be using for a particular book by using the Settings screen.
Funny Characters appearing in the text (FB2, MOBI, EPUB and HTML books)
Unlike TXT files, FB2, MOBI, EPUB and HTML files contain information to say how the file's bytes are intended to encode characters.
If your FB2, MOBI, EPUB or HTML document is displayed with streams of weird characters, particularly in places where you expected to see quote-marks, dashes or accented characters, it's happening because Freda was unable to understand the encoding information suppplied by the book file. That could happen, for example, because the file was badly formatted (some Gutenberg EPUBs have scrambled, unintelligible encoding info), or because the encoding is an unusual one. You can tell Freda what encoding it should be using for a particular book by using the Settings screen. Note that you may need to change the setting to explictly ignore the encoding provided by the book file, in the case that the book's encoding information is corrupted.
DRM-Protected Books
Books that you have bought and downloaded from such sites as Barnes and Noble and Kobo may well be DRM-protected (encrypted). This is very likely to be the case if you have downloaded them using Adobe Digital Editions; such books are typically protected using the ADEPT copy-protection mechanism. Freda cannot read DRM-protected books. If you try to read a DRM-protected book using Freda, you will generally see just blank pages. A careful search of the internet (or, to be honest, even a rather perfunctory one) will tell you how to remove ADEPT DRM-protection from EPUB books - but do note that the procedure may be illegal where you live. I cannot recommend that you use it.
Untrusted web-sites and https
HTTPS connectivity to websites and OPDS sources may fail if the site's certification authority is not trusted by the operating system on your device (i.e. the site's' root certificate is not in your device's certificate store). To fix this problem, install the necessary certificate.
HTML Books
HTML books are considered to consist of only a single file. If you have a set of HTML files that constitute separate volumes of a single work, Freda will be able to open them individually, but it will not understand references/links between them. If linkages between HTML files are important for you, you should build an EPUB file out of your collection of HTML files.
Freda is a work in progress, and if you should happen to encounter any problems, I will be pleased to fix them.
Bug Reports are best emailed to me at support@turnipsoft.co.uk (using the 'email for support' button')
Please give as much detail as you can about any message that Freda displayed when the problem happened.
Support Questions that the manual does not satisfactorily address can be emailed to me; I will answer them, and add to the manual as necessary. You can also take a look at the Freda forums, and ask me (and other Freda users) for assistance.